Advanced Multi Channel System - RGB+W
Programming your controller for RGB+W LED Strips:
Your 99 channel controller supports 4 different modes. Here are the RGB+W operating instructions for the Advanced Multi Channel System

STEP 1 - Set your controller to Led4
1) Connect your controller to a 12V or 24V power source
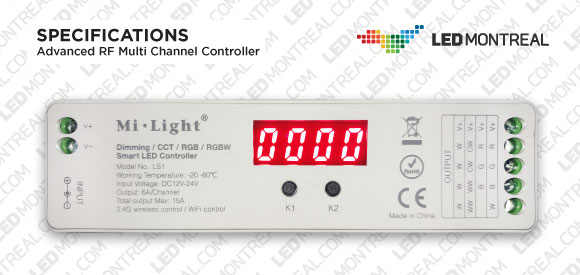
2) The red LED display on the controller will alternate between 3 messages: CH00, Led4 and 0000. Once Led4 appears, press the “K1” button for 3 seconds. The number 4 from “Led4” will start flashing.
3) Press the “K2” button to change the digit from LED4 to LED4 (until you see “Led4” on the display).
4) Release the “K2” button and wait 5 seconds. The display will start alternating again, indicating LEd4 instead of Led4.
STEP 2 - Assign an address to your controller
Make sure that every controller in your set up has a different address; this will allow you to operate every controller individually.
1) Press the “K1” button for 3 seconds when the 0000 message comes on. The first 0 will start flashing.
2) Press the “K2” button to change the first zero, if you do not wish to change it, press the “K1” button, the second number will then flash. Repeat the procedure for all four numbers until you get the unique address you want assigned to your controller.
3) Once you have assigned your last number, wait 5 seconds, the display will start alternating again. You should see your controller address in the sequence.
IMPORTANT: Make sure that you assign a number that is easy to remember as you’ll need the address when you want to adjust the Strips that are connected to this particular controller. For example, you could have all the controllers in your kitchen starting by 01 and assign one cabinet to 0100 and the next to 0101. Make sure to take note of each assigned address for future reference.
STEP 3 - Assign your Controller to a Channel
This step will allow several controllers to act in perfect synchronization. For example, if all the controllers in your living room are on channel 02 (CH02), they will all dim together when you select CH02. You cannot assign multiple Channels to your controller.
1) Press the “K1” button for 3 seconds when CH00 appears. The first 0 will start flashing.
2) Press the “K2” button until the number you want to assign comes on the display then press the “K1” button to go to the 2nd digit.
3) If you do not want to change the first digit, press the “K1” button to go to directly to the second digit. Adjust the second digit with the “K2” button.
4) Wait 5 seconds once the display is on the right number and you will see your channel number appear in the display sequence.
STEP 4 - Connecting your Strip and Pairing the Controller to the Remote
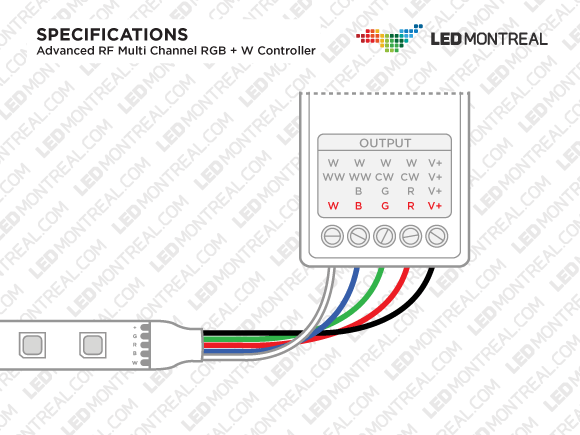
1) Disconnect the power from the controller and connect your Strip according to the drawing below (we recommend skinning the wire at about ½ inch for easier connection handling). Once your Strip is properly connected, your controller needs to be paired to your remote.
2) Connect your power source to your controller.
3) As soon as you see the display come on the controller, press the remote red ON key three times within 3 seconds of the controller powering on. Your Strip will flash 3 times to let you know that the controller and remote have been properly paired.
4) If you wish to unassign your controller, repeat the procedure, pressing the remote red ON button 5 times (versus 3 times for pairing). The Strip will flash 10 times once it has been unassigned.
How do I Select the Address and the Channel from my Remote?
To select the Address of the controller:
This function will allow you to control one controller at a time.
1) Press the SHIFT key on the remote until the address displays - - - - .Then press and hold the numeric key '1'. - - - - will only display for the first use, for subsequent uses, the LCD will display the last address used.
2) Use the numeric pad to enter the 4 digit address that you have previously assigned to the controller that you want to use. You will now be controlling the controller linked to this address.
To select the Channel of your controller:
This function will allow you to simultaneously control multiple controllers that are linked to a specific Channel.
1) Press the SHIFT key on the remote until you see CH - - then press and hold the numeric key '1'. CH-- will only display for the first set up. For subsequent uses, you will see the last Channel used.
2) Use the numeric pad to enter the 2 digit channel of the previously set up Channel that you want to use. You will now be controlling all the controllers linked to this Channel at once.
Using your Advanced Remote control for RGB+W
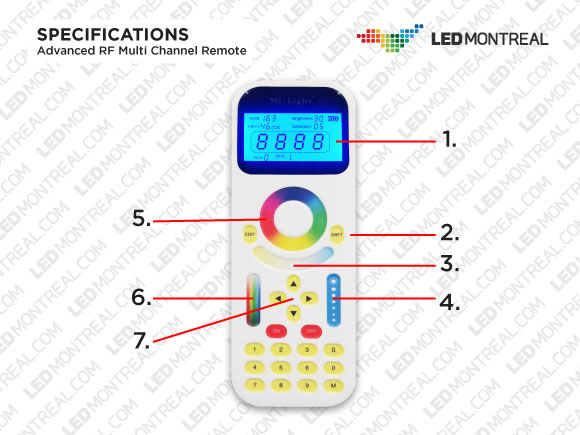
Your remote control is designed to be used with 4 different types of LED Strips therefore, only select buttons will be used with the RGB+W Strips. Here is an outline of the functions available for your application:
1) The LCD Screen will tell you what Channel or what Address you are using. You will also find information about the current brightness level of your LED Strip (1-99) and the color displayed by your Strip.
2) The Shift key is used to go from the Channel mode to the Address mode. As well, it’s the key that you will need to press prior to holding down ‘1’ key of the numeric pad to input the Channel or Address number you want to control.
3) When you use your Advanced Controller in RGBW mode, this touch slide pad is used to switch your color to white. Your white will be dimmed with the next key.
4) Use this slide touch pad to adjust the intensity of your Color or your White.
5) The touch sensitive color wheel allows you to directly access the color of your choice. Note that there are 256 colors to choose from and each color will be identified by a specific number on the LCD Screen under the RGB category.
6) The saturation slide pad is used to create pastels or lighter colors out of the solid colors available on the color wheel. Choose your base color on the wheel and use the slide pad to adjust it.
7) The UP and DOWN arrows will help you browse through the various flashing mode. Tap key 3 or 5 to exit the Flash mode. Side arrows are disabled

