How to install your new RF Multi-Zone LED Strips and/or Bulbs kit
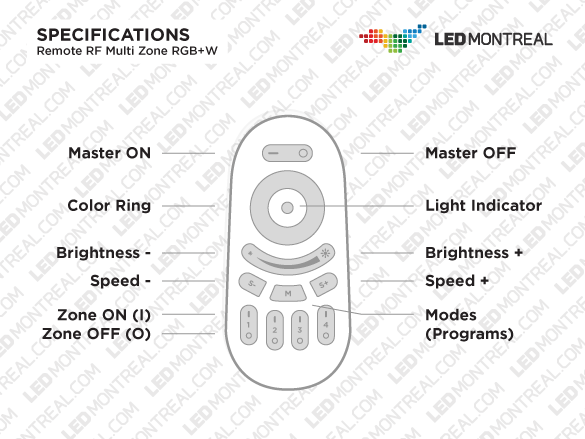
The multi-zone remote.
The remote requires 2 AAA batteries which are not included, so make sure you put some in before you start. The │ sign stands for ON and the O sign stands for OFF.
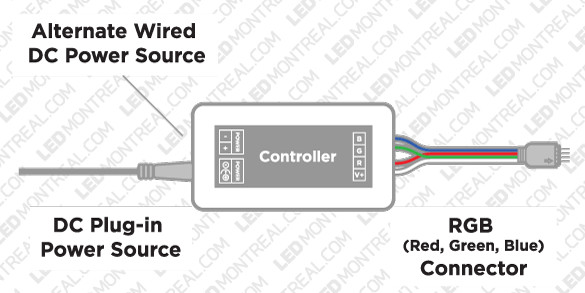
RGB LED strips and the RGB controller installation.
(for single color kits, see paragraph at the bottom)
- Properly skin the RGB wires to expose the metal and give yourself enough room to clamp on.
- Insert RGB wires into RGB V+ clamps on the controller (you need to unscrew them first).
- Red wire goes into R, green wire goes into G, blue wire goes into B, white (or sometimes black) wire goes into V+.
- If using a RGB connector with wires between the controller and the strip, make sure that the colors of the wires match by aligning the 2 arrows each located on a connector.
- Insert the DC plug-in end of the power supply cable into the controller’s female power plug.

DO YOU SEE BLINKING COLORED LIGHTS? THE REMOTE DOES NOT RESPOND?
When you power up your strips or bulbs, they automatically go into demo mode, which means that they will start blinking in various colors. Don’t panic, this is normal! You have to assign your strip or bulb to a zone to make it stop!
IMPORTANT STEP: PROGRAMMING
Assigning your strip or bulb to a zone.
- Power off the strip or bulb you want to assign. If you are programming a strip, disconnect the power supply.
- Turn the light back on and within 3 seconds, press the ON (|) button of the zone you want to assign to (1 to 4) on the remote.
- The light will slowly flash 3 times to indicate that it was successfully linked.
- Identify the zone to which the light is currently assigned, then power off the strip or bulb.
- Power the light back on and within 3 seconds; press the ON button of the previously assigned zone 5 times quickly.
- Light is now unlinked, you can program it again according to the assign to a zone procedure outlined above.
SINGLE COLOR MULTI-ZONE KITS, ANY DIFFERENCE?
The installation process is essentially the same for the single color Kits, the main difference being with the controller for strips. Plug the 2 wires from the strip into one of the two sets of LEDV+/LEDV- clamps (pick one or the other). Make sure you put the red wire into the V+ and the black wire into V-.

GOT MORE QUESTIONS? GIVE US A CALL!!
Montreal: 514-225-3777
Toll free: 1-855-533-4685