How to install LED Strips under your cabinets
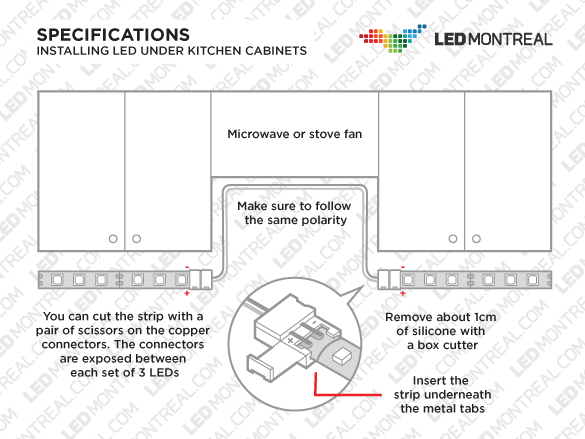
LED Montreal’s quick solderless connectors are the ideal accessory to make a perfect 90 degrees angle, to bypass a stove fan when lighting your kitchen cabinets or to extend a LED Strip. They are inexpensive, easy to use and they connect in just a few moments. We invite you to visit the connectors section of our website where you will find the right connectors for your project.
Please be aware that modifying or cutting your LED Strip voids its warranty. Therefore, we ask that you carefully test and inspect your Strip to ensure that it is fully functional prior to cutting it.
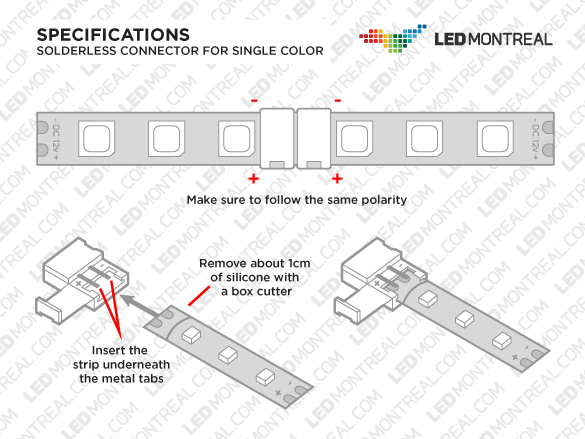
Installing a quick connector on your LED Strip is quite simple as they don’t require any soldering or professional equipment. Simply cut your strip on the exposed copper connectors located between every set of 3 LEDs. With a sharp knife, make a small incision in the protective silicon about 1cm away from the cut. Remove the silicon on top and the adhesive at the bottom (for the best results, we suggest cleaning the connectors with a toothbrush and rubbing alcohol). Insert your strip connectors underneath the metal tabs (RGB Strip have 4 tabs while Single Color Strips have 2) to make the contact then close the connector door and voila! You’ve got yourself a perfect, professional looking connection. For specific, more complete instructions, please visit the How to cut and reconnect your LED Strips using solderless connectors page.
Under cabinet lighting is one of the most frequent scenarios where quick connectors are required as user often need to hook up several short lengths of LED Strips together while bypassing obstacles.
For the best results, you need to keep one rule in mind: the total length of wire extensions cannot be greater than 5 meters per circuit. So, if you use a total of 10 meters of Strip, the maximum combined length of all extensions cannot be greater than 5 meters, otherwise the LED chips located at the end of your circuit will not be as bright and, in the case of RGB Strips, some colors will not display properly.
Once you have all you calculations in hand and are ready to go, all you need to do is to either take the precut 1 or 2 meters extensions and make your connections or make your custom connections using the 17 cm connector, cutting it in half and installing the required lenght between the two connectors.

