How to install and make your RF 3-key, Wall or Wireless Wall Dimmer work properly
DIMMER
These three dimmers can’t hold more than 8 amps, meaning that you can’t use them for more than 10 meters of 3528 LED Strip OR 5 meters of 5050 LED Strip.
DIMMER INSTALLATION
1. Connect your strip to your dimmer:
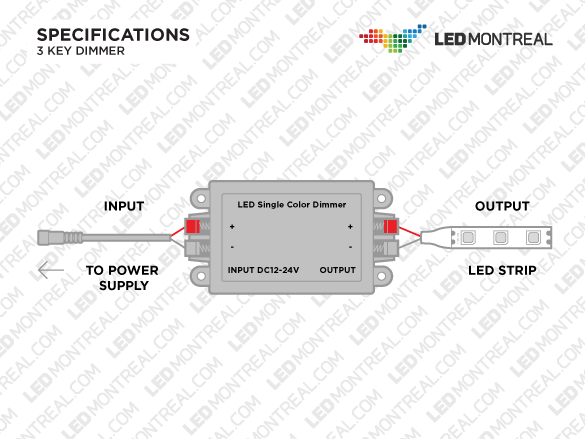
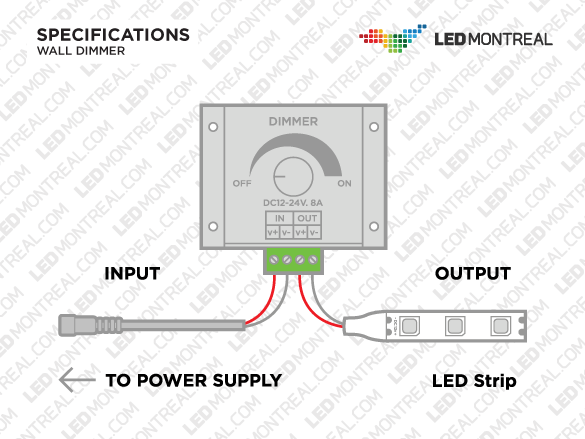
If the connector on your strip is 2 wires (red/black), connect directly to the dimmer output (make sure you skin the wires properly first).
- • For RF Dimmer with 3-key remote and wireless wall dimmer: Insert wires into the clamps (red wire into red, black into black).
• For Wall Dimmer: Unscrew the clamps, then insert the wires into them and screw back (red wire into V+, black into V-)
In all cases, if you’re using a male DC adapter for the strip, properly skin its wires, attach them to the dimmer, then plug your strip into the adapter.
2. Connect your power supply to your dimmer:
Plug your female DC adapter into the dimmer’s input. Again, make sure the red-black wires on the adapter are properly skinned, then insert into the clamps (For wall dimmer: red into V+, black into V-). Plug your power supply into the adapter (and into the wall plug). If you don’t have an adapter, you can just cut off the power supply’s male DC plug and use the red-black wires inside.
Please note that when almost fully dimmed, the light might flicker. This is normal as LEDs require a minimum amount of current to turn on.
EXTRA NOTE ABOUT THE RF DIMMER WITH 3-KEY REMOTE:
If the setup isn’t connected properly, your strip might light up but your remote won’t work. After making sure the setup is ok, if the remote still doesn’t work, you can reset it by holding the on/off button for about 20 seconds until the strip flashes.

WIRELESS WALL DIMMER - How to install your wireless remote in your wall socket:
First thing you need to do is to take out the back piece in order to make sure the remote fits in your wall socket. Take out the front piece by simply pulling on it and put it aside. You’ll see the battery compartment and 2 screws. Unscrew them and take out the back piece. You can now install it in your wall socket by screwing it to the metal casing inside the wall socket. Once this is done, put back the front piece and you’re all set!
If you don’t have an available wall socket, you can install the wireless remote directly on your wall. Take out the front piece by simply pulling on it and put it aside. You’ll see the battery compartment and 2 screws. Unscrew them and take out the back piece. The 4 holes on the back piece allow you to install it on your wall (or basically anywhere you want) by screwing it in. Once this is done, screw back the middle part of the wireless remote and clamp back the front part as well. All done! Note that if you don’t want to screw it into your wall, you can always use velcro our double sided tape.

GOT MORE QUESTIONS? GIVE US A CALL!!
Montreal: 514-225-3777
Toll free: 1-855-533-4685