WL5 - 5 in 1 Wi-Fi Controller for LED Strips - Alexa and Google Assistant
5 in 1 Wi-Fi Controller for LED Strips - Alexa and Google Assistant (WL5)
This LED strip controller is without doubt one of the most complete on the market! Plugging directly into your 2.4 GHz Wi-Fi network without additional control module, it controls any of the following types of LED Strips: Single Color, Variable White, RGB, RGB + W, RGB + Variable White. You can control up to 8 zones (you can put multiple controllers of the same type on one zone) using the app and an almost unlimited number of zones from your Google or Alexa assistant. The WL5 LED controller has wireless synchronization technology: if you have multiple controllers in the same area, these will relay the signal to keep you in perfect sync, giving you impeccable, seamless color changes every time.
The WL5 LED controller is intended for the intermediate to advanced user who is comfortable with Wi-Fi technologies and mobile devices. LED Montreal does not offer support for integrating the WL5 controller to your Google Assistant or Alexa system.
This powerful LED controller works on both 12 and 24V DC circuits and has a maximum capacity of 15 Amps. It is mainly designed to be connected to a mobile device or tablet via a Wi-Fi network and to be integrated to a Google or Alexa assistant. You can still combine the WL5 LED controller with a remote control or a wall panel. The controller must however be programmed beforehand via a mobile device in order to add a physical remote control.
It's easy to program your WL5 LED controller
To program a remote on your WL5:
Pre-programming:
If your controller is not already connected via Wi-Fi (If it is already connected via Wi-Fi, proceed directly to the programming step): Make sure the LED indicator corresponds to the type of LED strip you have (press the "set" button repeatedly until you get the desired LED color).
White: Single Color Strip
Yellow: CCT Strip
Red: RGB Strip
Green: RGBW Strip
Blue: RGB CCT Strip
Programming:
For a new product or a product that has never been linked before (if the product is already in a Zone, the deprogramming instructions are found in the next step):
Disconnect the power to the controller to turn off the light(s) you want to program.
Turn on the light(s) and within 3 seconds, press the ON " | " button three times for the zone you want to assign (1 to 4 or 1 to 8) on the remote control.
The LED strip will flash slowly 3 times to indicate a successful connection. You can repeat this procedure for each controller you want to add to your zone.
To deprogramm the controller or move it from one zone to another :
If the light you want to add to a zone has already been assigned to another zone, you must first dissociate that light.
Identify the zone to which the light is currently assigned.
Disconnect the power to turn off the light(s) you want to program.
Turn on the light(s) and within 3 seconds, quickly press the ON " | " button 5 times for the previously assigned zone. You can then proceed to program your lighting according to the above-mentioned addition procedure.
Wi-Fi connection
Before you start: make sure you are connected to the Wi-Fi network on which you will use your controller. Disable the 5.0 GHz bandwidth of your router. Your system will only operate on the 2.4 GHz band. Consult your internet provider or your router's instruction manual for full details.
1- Download the free Mi Boxer application on your mobile or tablet. Don't forget to create an account.
2- Connect your LED strip to your WL5 controller, do not forget to strip your wires well when connecting. Now connect the transformer to the controller. The red light on the controller will turn on. The LED strip will remain closed. Press the button on the controller for 3 seconds. The red light will start to flash. The light must flash to continue the programming process.
3- In your application, press the + tab in the upper right corner of your screen to then choose "Smart Strip Controller".
4- The application will ask you to validate if the red light is flashing well.
5- Enter the connection info for your Wi-Fi network.
6- The application will configure your controller for you. You will then choose the type of LED to control, this is when your Ribbon will light up.
7- You can now configure your Google or Alexa assistant and / or add a remote control to it. You will find the remote-control programming process on the remote control product page.
You may now restore your 5 GHz band on your router.
Specifications:
Model: WL5
Voltage: DC12 ~ 24V
Output power: 6A / Channel
Total power: Max.15A
Operating temperature: -20 ~ 60 ℃
Communication mode: WiFi-IEEE 802.11b / g / n 2.4GHz
RF: 2.4GHz
Dimensions: 124mm x 38mm x 23mm
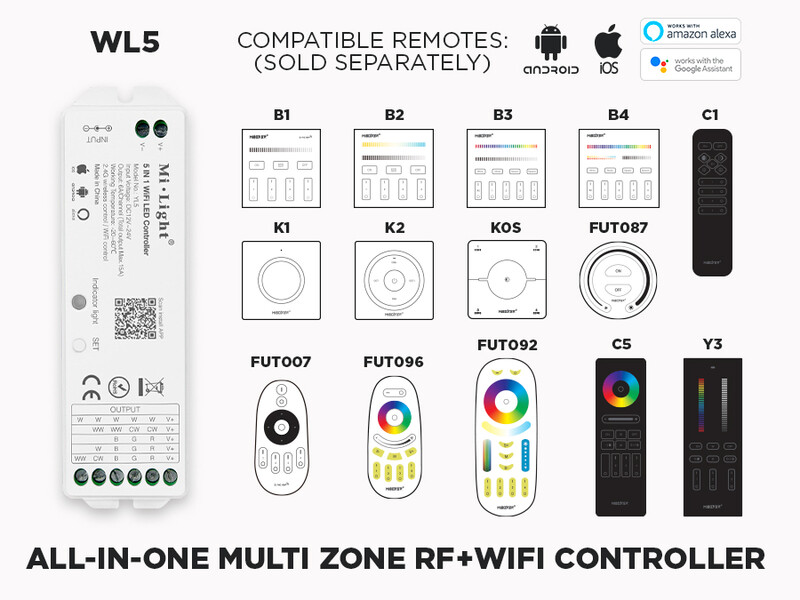
Compatible Remotes (sold separately):
1 Zone RF Wall Remote for Single Color: FUT087
1 Zone RF Rotary Wall Remote for Single Color: K1
1 Zone RF Removable Wall Remote for Single Color and CCT Adjustable White: K2
4 Zones RF Remote for Single Color and CCT Adjustable White: C1
4 Zones RF Remote for Single Color and CCT Adjustable White: FUT007
4 Zones RF Wall Mounted Panel for Single Color: B1
4 Zones RF Wall Mounted Panel for Single Color and CCT Adjustable White: B2
4 Zones RF Wall Mounted Panel for Single Color and CCT Adjustable White: K0S
3 Zones RF Vertical Remote for all types of LED strips: Y3
4 Zones RF Remote for RGB and RGB+W: FUT096
4 Zones RF Remote for all types of LED strips: FUT092
4 Zones RF Remote for all types of LED strips: C5
4 Zones RF Wall Mounted Panel for for RGB and RGB+W: B3
4 Zones RF Wall Mounted Panel for for all types of LED strips: B4
8 Zones RF Remote for all types of LED strips: FUT089
8 Zones RF Wall Mounted Panel for for all types of LED strips: B8

